- Introduction to Form Manager
- Create a simple form
- Viewing Form Record
- Updating a Form
- Using Folders to Organize Forms
- Save Form as Template
- Advanced Form Settings
- Add-Ons
- Reset Stats
- Copying a Form
- Delete a form
- Add conditional logic to a form
- Publish and Share a Form
- PopUp Designer: Place the form inside a popup
- Share Form By Email
- Download QR Code
- Form’s Backend Endpoint / Download the HTML
- Apply a theme to the form
- Form Page Settings
Introduction
Form Manager is the application most important part. You can see here all the forms you have been created in Jazz Forms, plus all the actions that can be performed with each. For example, you can access to the users submissions, create reports, view statistics and more.

Note: To access the Form Manager click the “Forms” menu in the navigation bar.
Create a simple form
Before you create your first form, please read the Form Builder documentation.
If you are on the Dashboard or in the Form Manager, follow these steps:
- Click “Create Form”
- Drag and drop all the fields that your form needs.
- Drag and drop one button or more, according to your needs.
- Click “Save Form”. A modal window will appear with 3 options:
- Continue editing the form.
- Go to Advanced Form Settings
- Go to Form Manager
Note: If you close the modal window without choosing one of these three options, when you “Save” again, you create another form and not edit the already created. This option can be useful if you want to create several similar forms quickly.
Viewing Form Record
To view the Form Record, click on the form name in the Form Manager. You can view from here its configuration and access all your options.

Updating a Form
If you have questions about updating your first form, please read the Form Builder documentation.
Updating a form can be done in two ways:
- From the Form Manager
- Locate the form to update
- Click on the “Actions” button and select “Update”
- From the Form Record
- To access the Form Record click the name of the form
- Then click the “Update” button (the pencil icon)
- Drag and drop one button or more, according to your needs.
- Click “Save Form”.

Note: While you can update a form at any time, the information gathered by them (submissions and reports) may be affected or lose coherence.
Using Folders to Organize Forms
You can organize your forms in folder. Click here to read more.
Save Form as Template
To save your Form as a Template, follow these steps:
- Go to the Form Builder
- Click the Up Arrow (At the right side of the “Save” button)
- Click “Save Form As Template“
- Then you will be redirected to the Template Manager.

Advanced Form Settings
To access the Form Settings, you must be in the Form Manager. Then perform the following steps:
- Click on the name of the form you want to set
- Click on “Settings” (the gear icon)
In Settings, you will see 4 tabs. Each of these tabs contains the setting of a form aspect:
1. Form Settings
The Form Settings tab is the starting point for configuring your forms in Jazz Forms. This default section allows you to customize form properties, define access controls, and specify behavior settings.
Key Configuration Options
- Form Name: Displayed in the application administration pages and as the public page title for the form.
- Slug: Customize the URL for your form. By default, the slug is generated from the form name but can be edited for better readability.
- Status: Indicates whether the form is active or disabled. If set to “Off,” the form will display a custom message and stop accepting submissions.
- Created By: Administrators can assign forms to specific advanced users.
- Language: Choose the language for form messages, such as validation errors. Additional languages can also be added.
- Text Direction: Set text direction as Left to Right (LTR) or Right to Left (RTL) to match the content’s layout.
- Private Access: Restrict access to logged-in users with appropriate permissions. Unauthorized users are redirected to the login page.
- Message: Customize the message shown to users when a form is disabled.
- Shared With: Share forms with:
- None: Visible only to the creator.
- Everyone: Accessible to all users (requires manager permissions).
- Specific Users: Share with selected users, provided they have required permissions (e.g., viewSharedForms).
- Generate Submission Number: Assign sequential submission numbers. Numbers increase by 1 unless a larger starting number is specified.
- Number Width: Define the minimum length of the submission number (e.g., “00001”).
- Number Prefix/Suffix: Add custom prefixes or suffixes to the submission number.
Advanced Options
- Save to Database: Decide whether submissions are stored in the database. Email notifications remain unaffected.
- Owner Scope: Restrict submission management to form managers.
- Protected Files: Allow only logged-in users with form access to download files.
- Time Zone for Submissions: Apply a specific time zone for submission timestamps.
- Date Format: Use a custom date format for submission timestamps.
- Editable Submissions: Enable users to edit submissions for a set duration:
- During: Specify the duration (e.g., “1”).
- Unit of Time: Choose between hours, days, weeks, etc.
- Conditions: Define conditions for allowing edits.
Submission Limits
- Total Submissions: Set a maximum number of submissions for a form.
- Action: Choose the action when the limit is reached (e.g., show an error or disable the form).
- Time Period: Specify whether the limit applies to all time or a specific period.
- Per User Limit: Restrict submissions by individual users.
- Limit By: Options include IP Address, Browser Fingerprint, or both.
- Time Period: Define the counting period for submissions.
Scheduling and Security
- Form Activity Schedule: Set a start and end date for when the form is active.
- Start Date: Activate the form on this date.
- End Date: Deactivate the form on this date.
- Password Protection: Add a password for form access.
- Spam Filter: Enable honeypot protection to reduce bot submissions.
- Authorized URLs: Restrict embedding the form to specific domains.
- URLs: List of authorized domains.
- Unauthorized URL Message: Customize the error message for unauthorized domains.
Validation and Analytics
- Client-Side Validation: Enable or disable browser-based validation. Server-side validation remains active by default.
- IP Tracking: Decide whether to collect IP addresses. Disabling this enables IP anonymization for analytics.
- Analytics: Monitor form performance with or without IP tracking.
- Autocomplete: Allow browsers to save and auto-fill form data.
- Save & Resume Later: Enable users to resume partially completed forms by storing data in their browser automatically.

Note: There are conditionally required fields. For example, if you activate the Schedule Form Activity option, you must enter a Start and End Date. If you leave these fields in blank, you cannot save the Form Settings and instead, an error message appears.
2. Confirmation Settings
This tab allows you to configure four key aspects of the submission confirmation:
- Inform to the user immediately: Whether using a text message (alone or above the form) or redirect the user to another web page. In the first case, you must type the message to display and in the second, the full URL of the web.
- If you’d like to make the message more personal, you can insert field variables (placeholders) into a confirmation message or confirmation URL, in similar way as a confirmation message by email. Once the form has been submitted, the placeholder will be replaced with the information placed in that field. For more details, go to the ‘Customizing the message’ documentation.
- To Redirect the browser to another page, you can set up 3 additional parameters
- Show Message and Redirect After: Here you can enter a number of seconds to start the redirection.
- Append Submission Data to URL: This is useful for small forms when you want to append all the collected data to the URL. Eg. https://www.example.com/thanks.html?text_0=John&[email protected]
- Replace Field Name with Field Alias when it’s available: If this option has been enabled, the collected data will be appended using the Field Alias. Eg. https://www.example.com/thanks.html?name=John&[email protected]
- Conditional Logic With this tool you can customize the way that you handle and process your submissions, giving you more control once a user has submitted your form. A common example of this would be if you wanted to provide your end users the option to download a file. In this scenario you can redirect to the file to start the download process. But, if the user don’t want to get the file, we will show the Thank You message.
- Send confirmation email to the user: If you select this option, each time a user submit a form will receive an email that will thank him.
- Double Opt-In You can enable the double opt-in feature to confirm your form submission. Then you can use the placeholder:
{{optin_link}}to present the link to the Opt-In Confirmation Page. When the end-user clicks this link can be redirected to another web page or see a custom Thank You message.
Note: When the end user confirms their Opt-In, the following event will be triggered: Email has been verified by double opt-in. This event can be used in different parts of the system, for instance to send email notifications.

3. Notification Settings
In this tab you can configure how Form Submissions will be sent to your email (All data, only a link to the data or a custom message). Additionally, you can set the email subject, email addresses and more.
Four things to keep in mind:
- If the form has fields of “Email” type, you can select them as Send To and/or Reply To email address.
- If the form has fields of “File” type, you can attach uploaded files to emails.
- If you choose only Plain Text, a default message with all the submitted data will be sent in plain text.
- You can choose the event when the email notification will be sent:
- Email is verified by double opt-in
- Form is submitted (New Entry)
- Form is submitted (Edit Entry)
- Submission is created
- Submission is updated
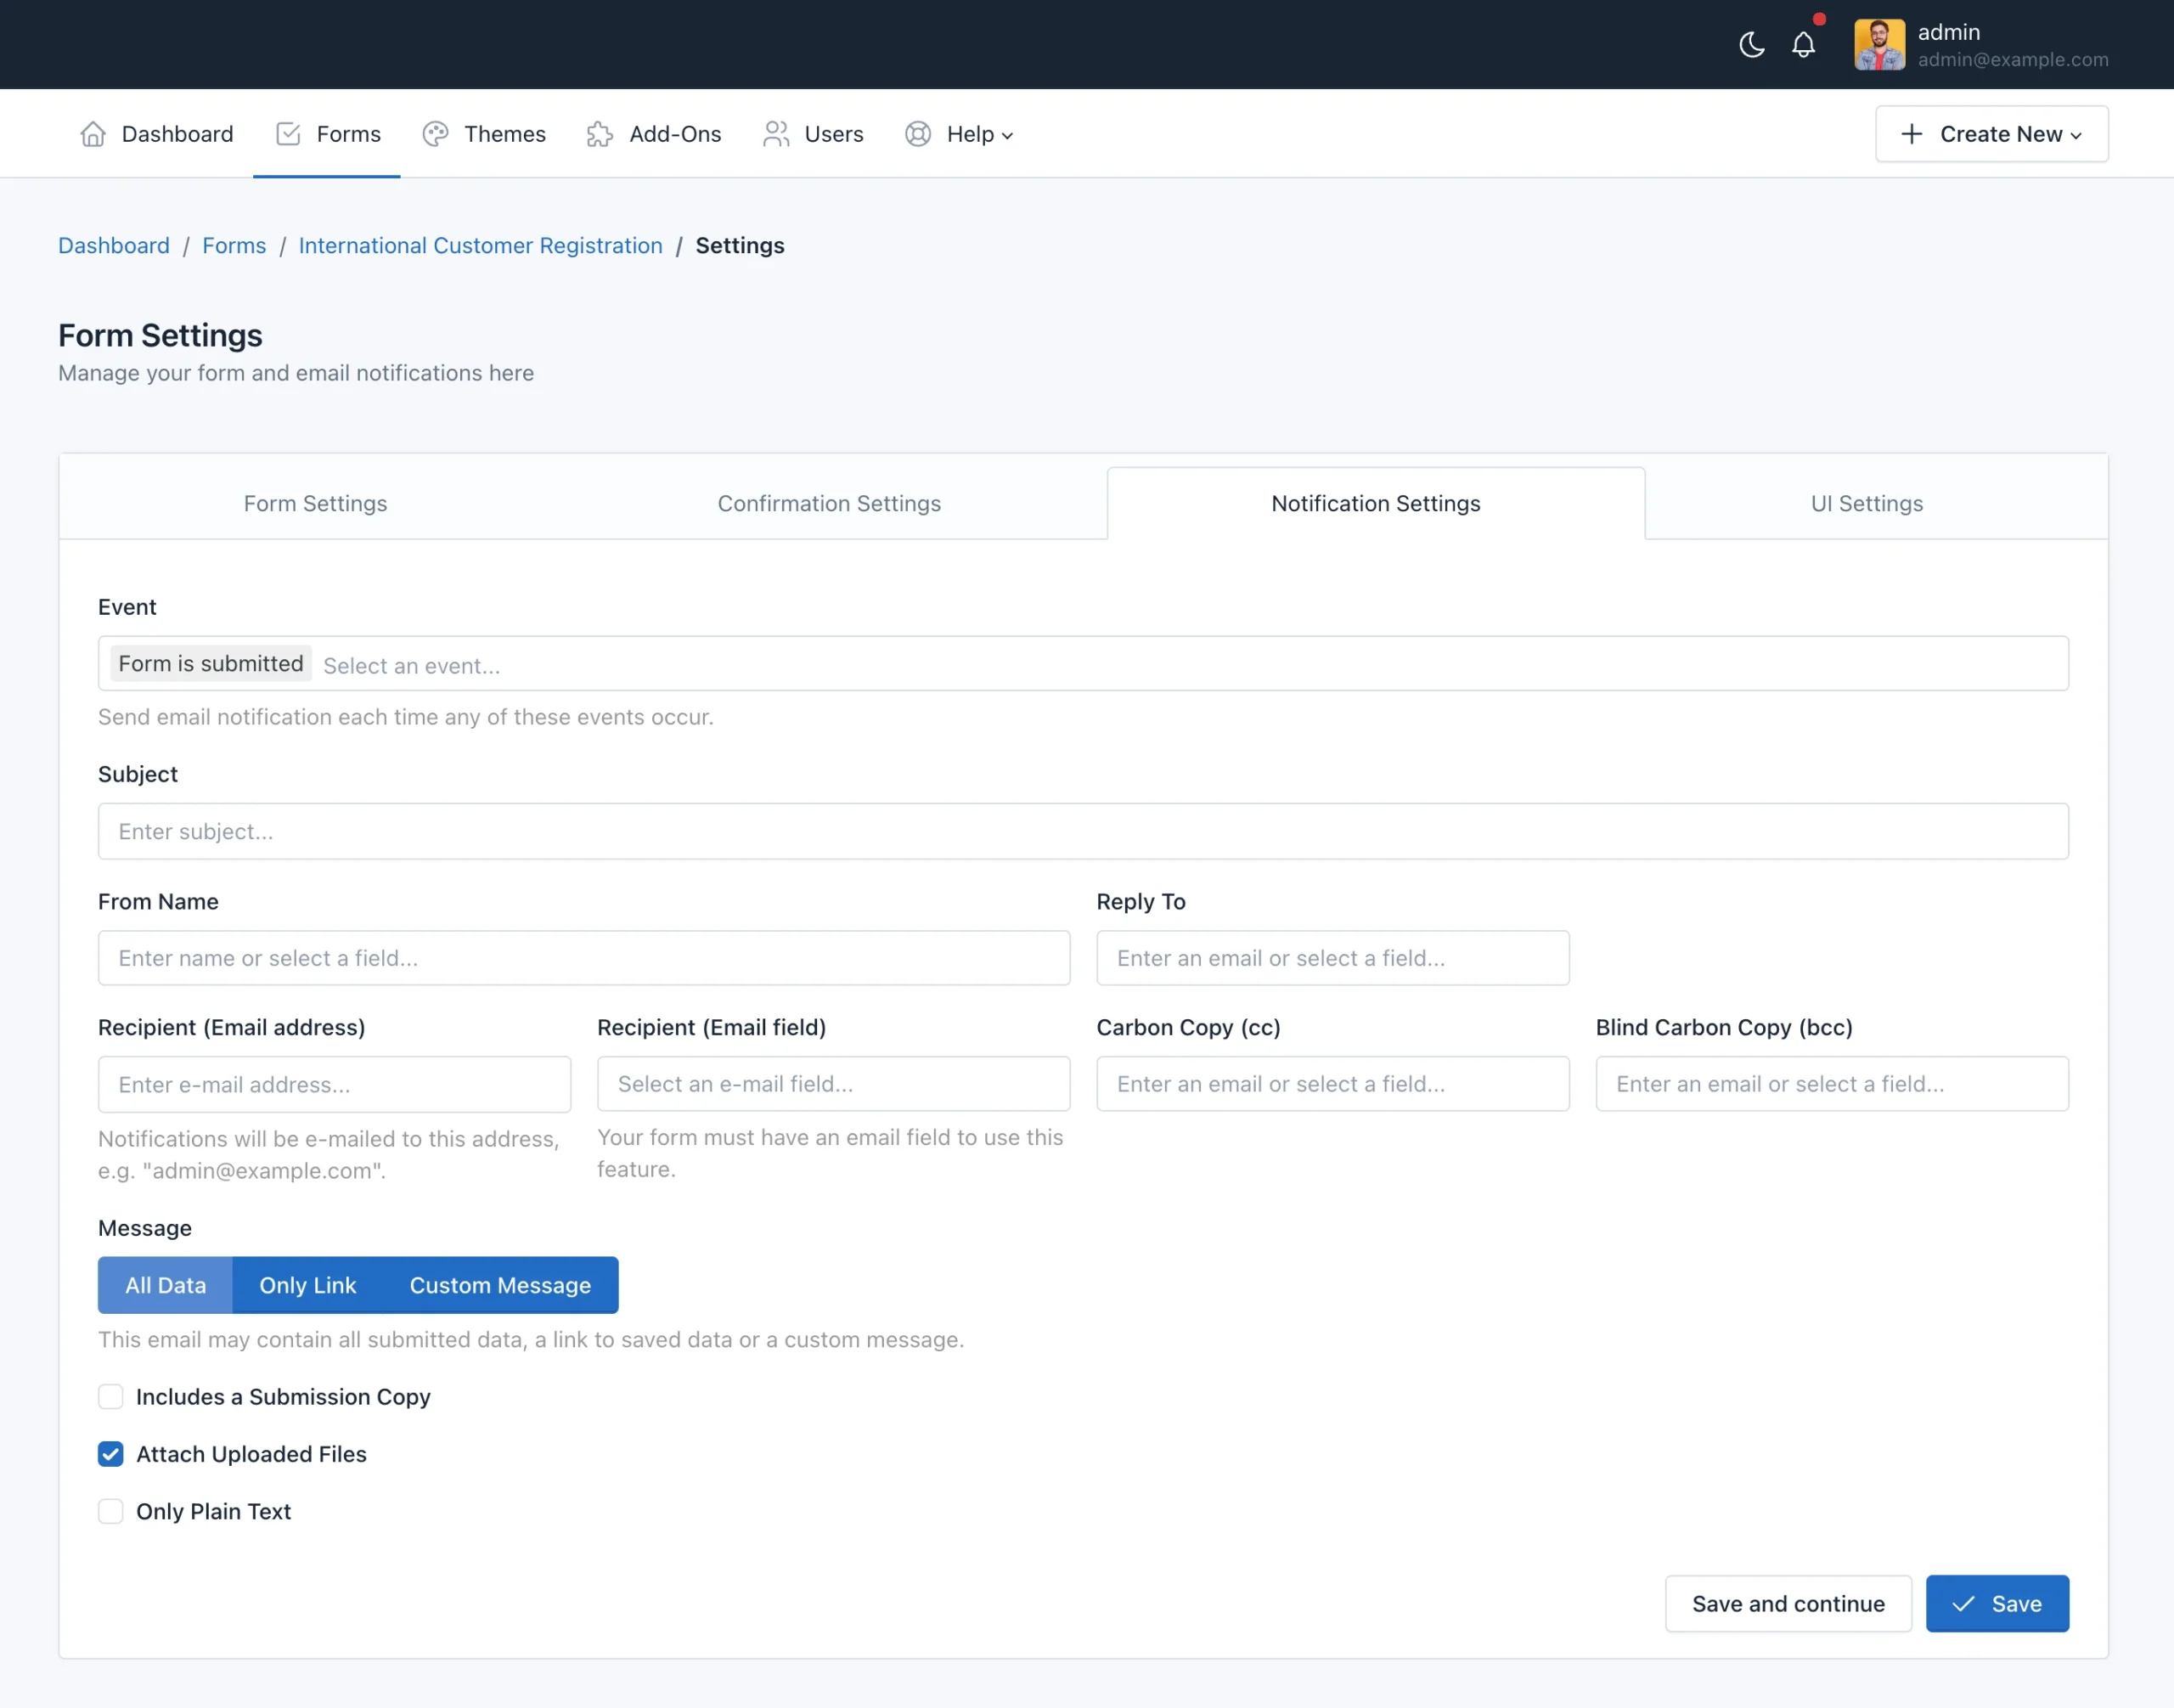
Note: You can insert placeholders (field variables) into a notification email. For more details, go to the ‘Confirmation Settings‘ documentation.
4. UI Settings
UI = User Interface.
From here you can modify the form appearance: The design by using themes, and the functionality by using an external JavaScript file.
- Javascript UI Widgets: Select a UI Widget or Enter the full URL of the JavaScript file that will be loaded with your form. By default, the jQuery library is available for you to make use of it when interacting with the form.
- Select a Theme: You can select the theme that best fits your form or one you have created yourself. When you select a theme from the list, the form will be automatically displayed with the design chosen theme. You can change the themes over and over again to see differences.

Note: To save all the changes you make on any tab, click the “Save” button.
Add-Ons
You can use add-ons to do more with your Forms. If a user has permission to access the add-ons, the option “Add-Ons” will appear in the Form Manager (Forms > Actions > Add-Ons), from here you can manage the add-ons configuration that are active and are available for each form.

Reset Stats
You can reset the form stats from the Form Manager, by clicking the “Actions” button and “Reset Stats“. Then it will show a popup asking you to confirm your decision to delete the stats.
Copying a Form
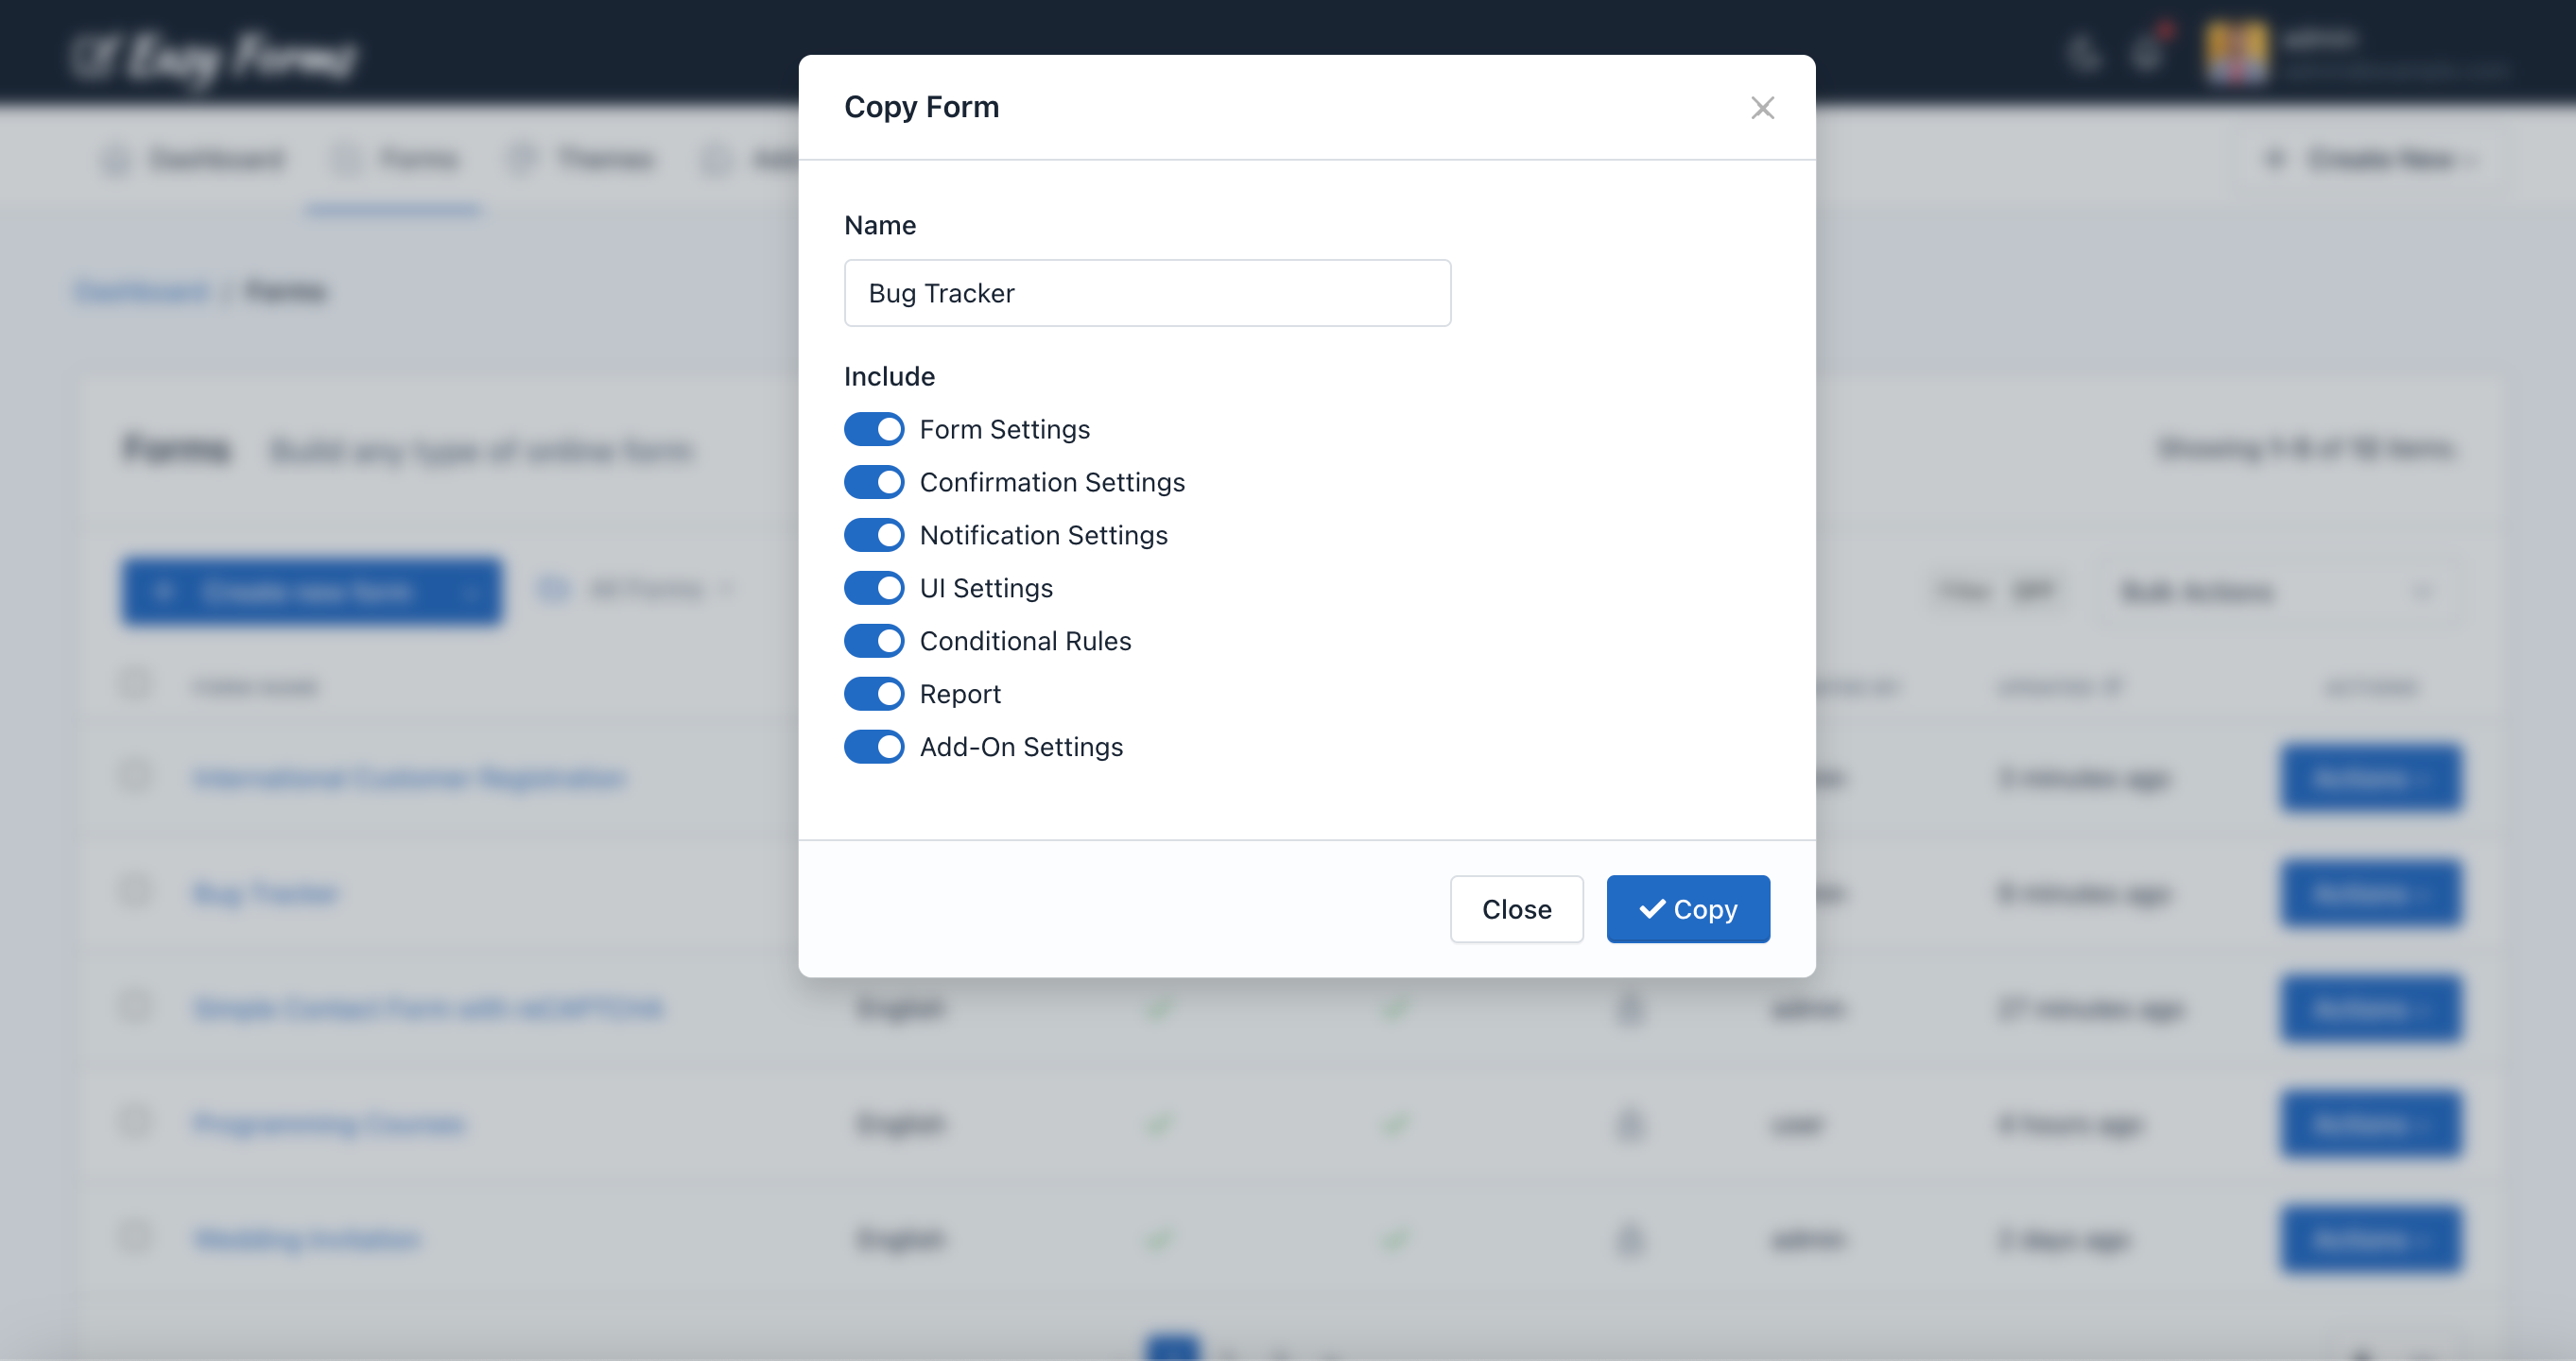
If you want to copy a form to save time, we make that process easy for you.
- To copy a form, click on the “Forms” link.
- Then, click on the “Actions” button next to the form you would like to copy.
- Then, click Copy and popup form will appear. The form name will be given by the name of your original form with “- Copy” added to it.
- You can change the name of your form
- You can select what settings should be included in the new form
- Finally, click “Copy“.
The Form Manager will display the copied form on the top of the list.
Delete a form
You can delete a form from the Form Manager, by clicking the “Actions” button and “Delete”. Then it will show a popup asking you to confirm your decision to delete the form.
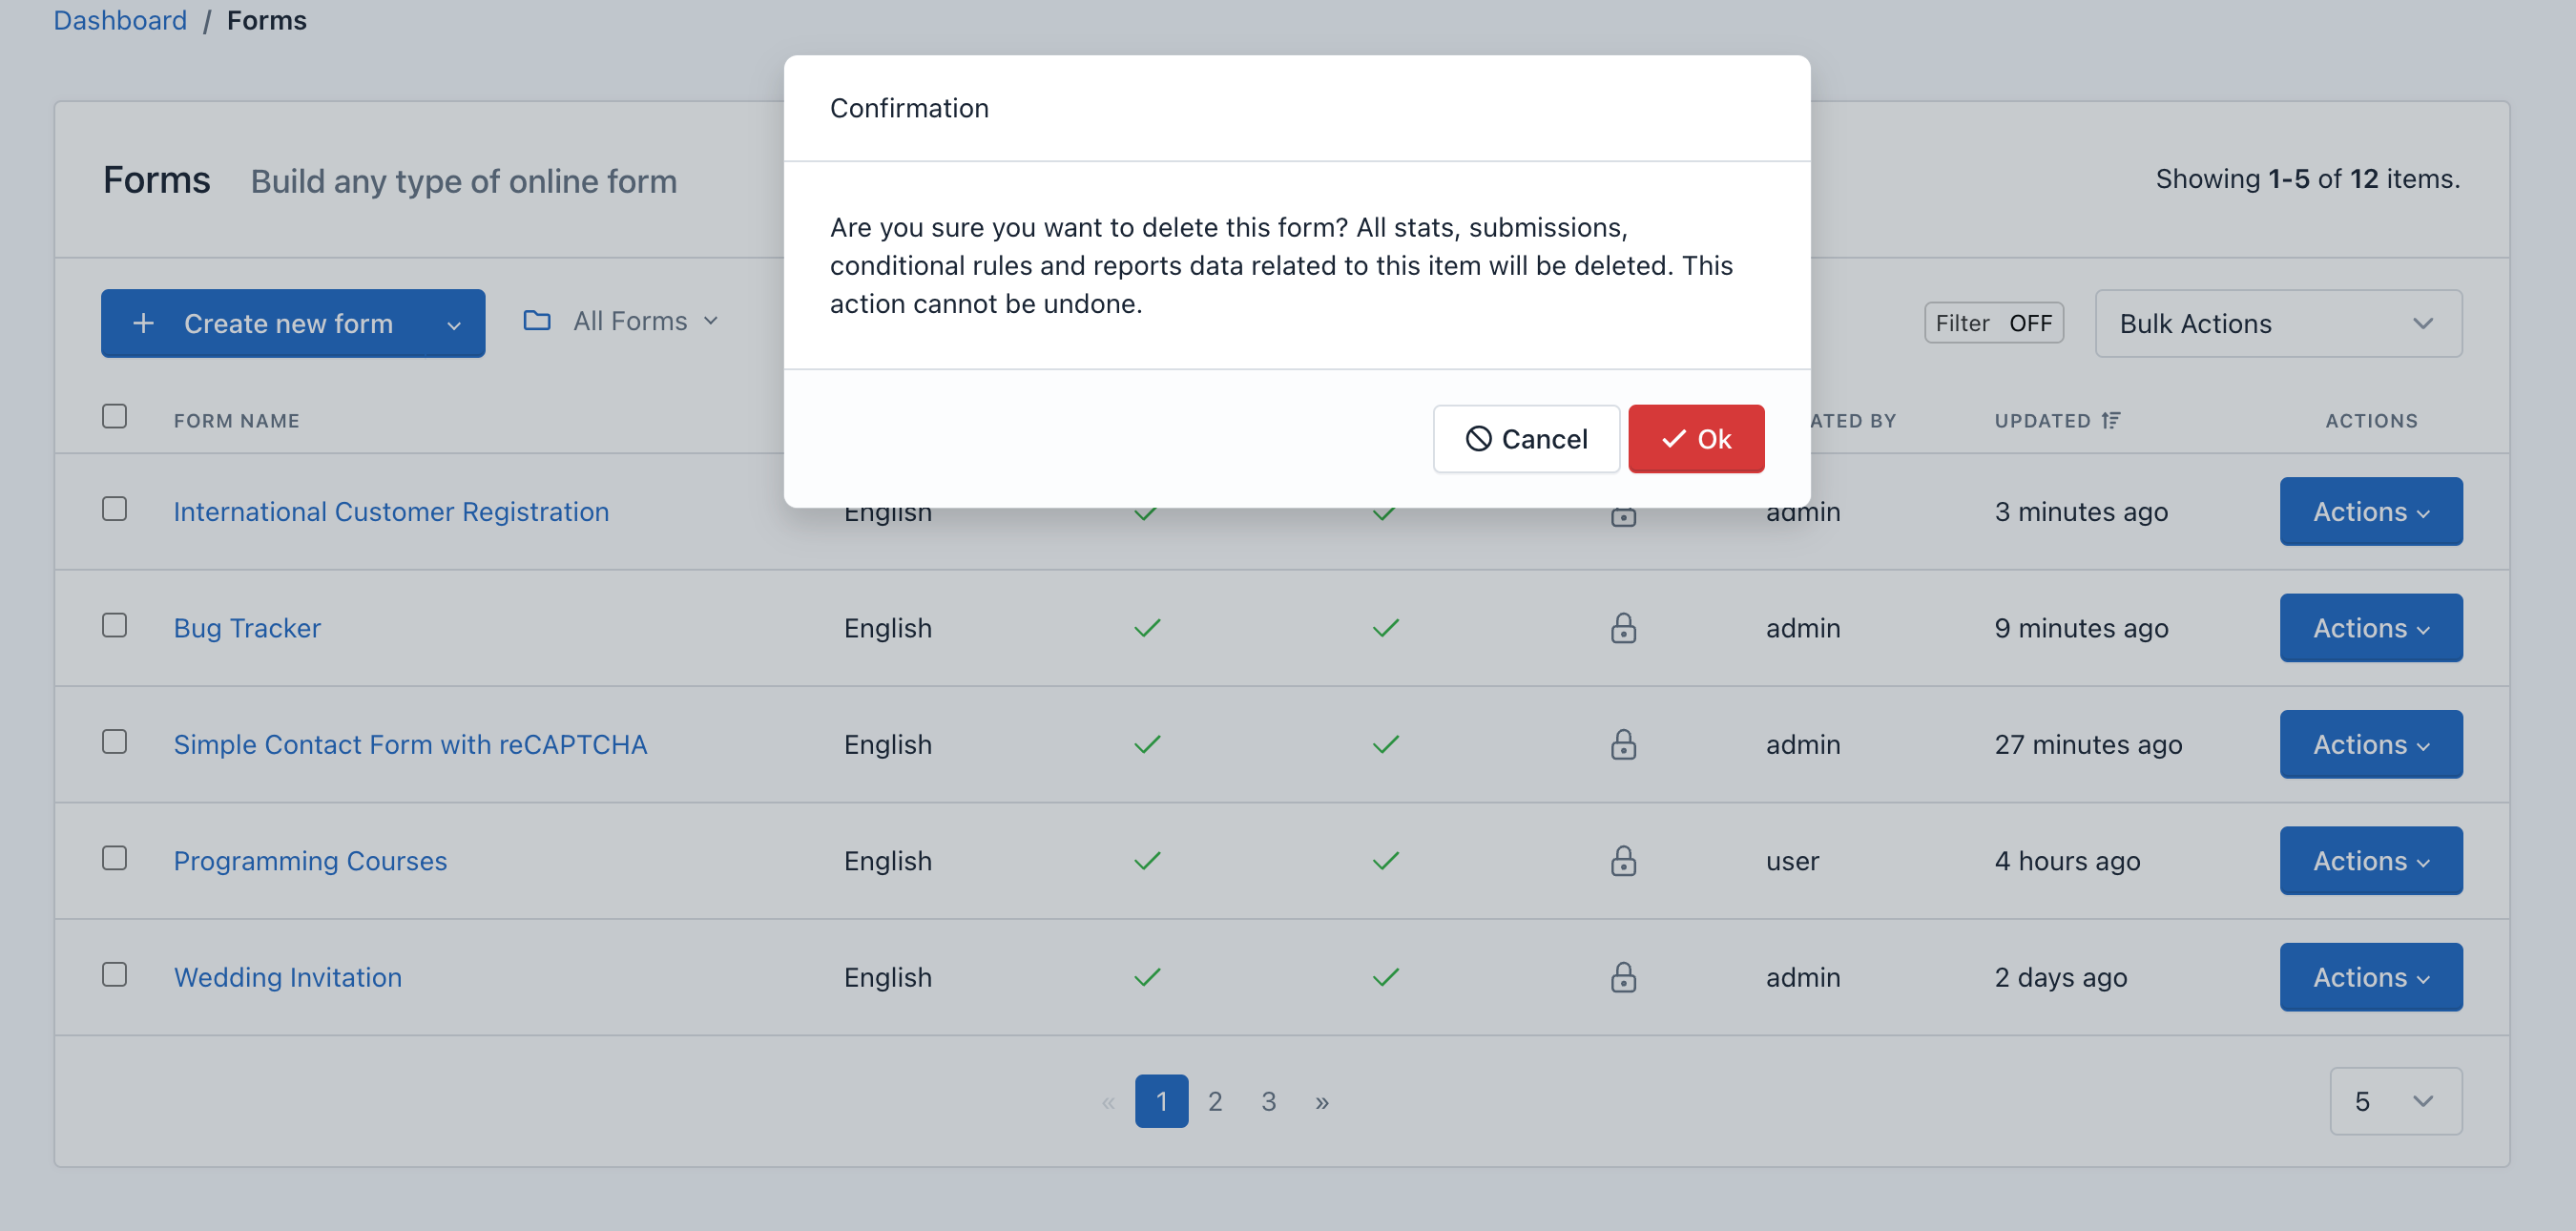
Important! When you delete a Form, all content related to it will be deleted too, including: Submissions, reports and graphs, statistics, configurations and more: This action cannot be undone.
Add conditional logic to a form
Jazz Forms features a powerful and intuitive tool to add conditional logic to a form.
The rules are based on the information that the form fields have at any given time and allow you to disable or enable and show or hide fields and other elements in the DOM. In addition, you can also do math and skip pages with this powerful tool.
You can access the Rule Builder from the Form Manager:
- In the navigation bar, click “Forms”
- Click on the form name
- Click on the button “Conditional Rules” (Flow Graph icon)

Note: If you have questions about your first conditional rule, please read the Rule Builder documentation.
Publish and Share a Form
You can access to publish and share a form using the Form Manager:
- In the navigation bar, click “Forms”
- Click on the form name you want to share
- Click on the “Publish and Share” button (the green arrow icon)
- This allows you to get the code to be placed on the website which will display the form (inline or in a modal pop-up). You can also copy the form permanent link and share it via email or social networks. And now, with the 1.1 version you can also share links with friendly URLs to your forms, immediately!
Note: Keep in mind that if you are going to share your form with a friendly URL, you must also update your theme background-image (if using one).
In addition, the forms can be published in two formats: With or Without design (no theme) and can be shared in different ways, depending on the configuration you assigned. For example, you can share the Form in complete page and without the application logo.

PopUp Designer: Place the form inside a popup
You can place the form inside a popup and design the look and feel of this popup without writing a single line of code.
To use the PopUp Designer, follow the next steps:
- In the navigation bar, click “Forms”
- Click on the form name you want to share
- Click on the “Publish and Share” button (the green arrow icon)
- Click on the “Embed Pop-Up Form” menu.
In this page you can create popups that will get your visitors attention.
You can customize a lot of options like colors, borders, radius, backgrounds, button placements and many more.
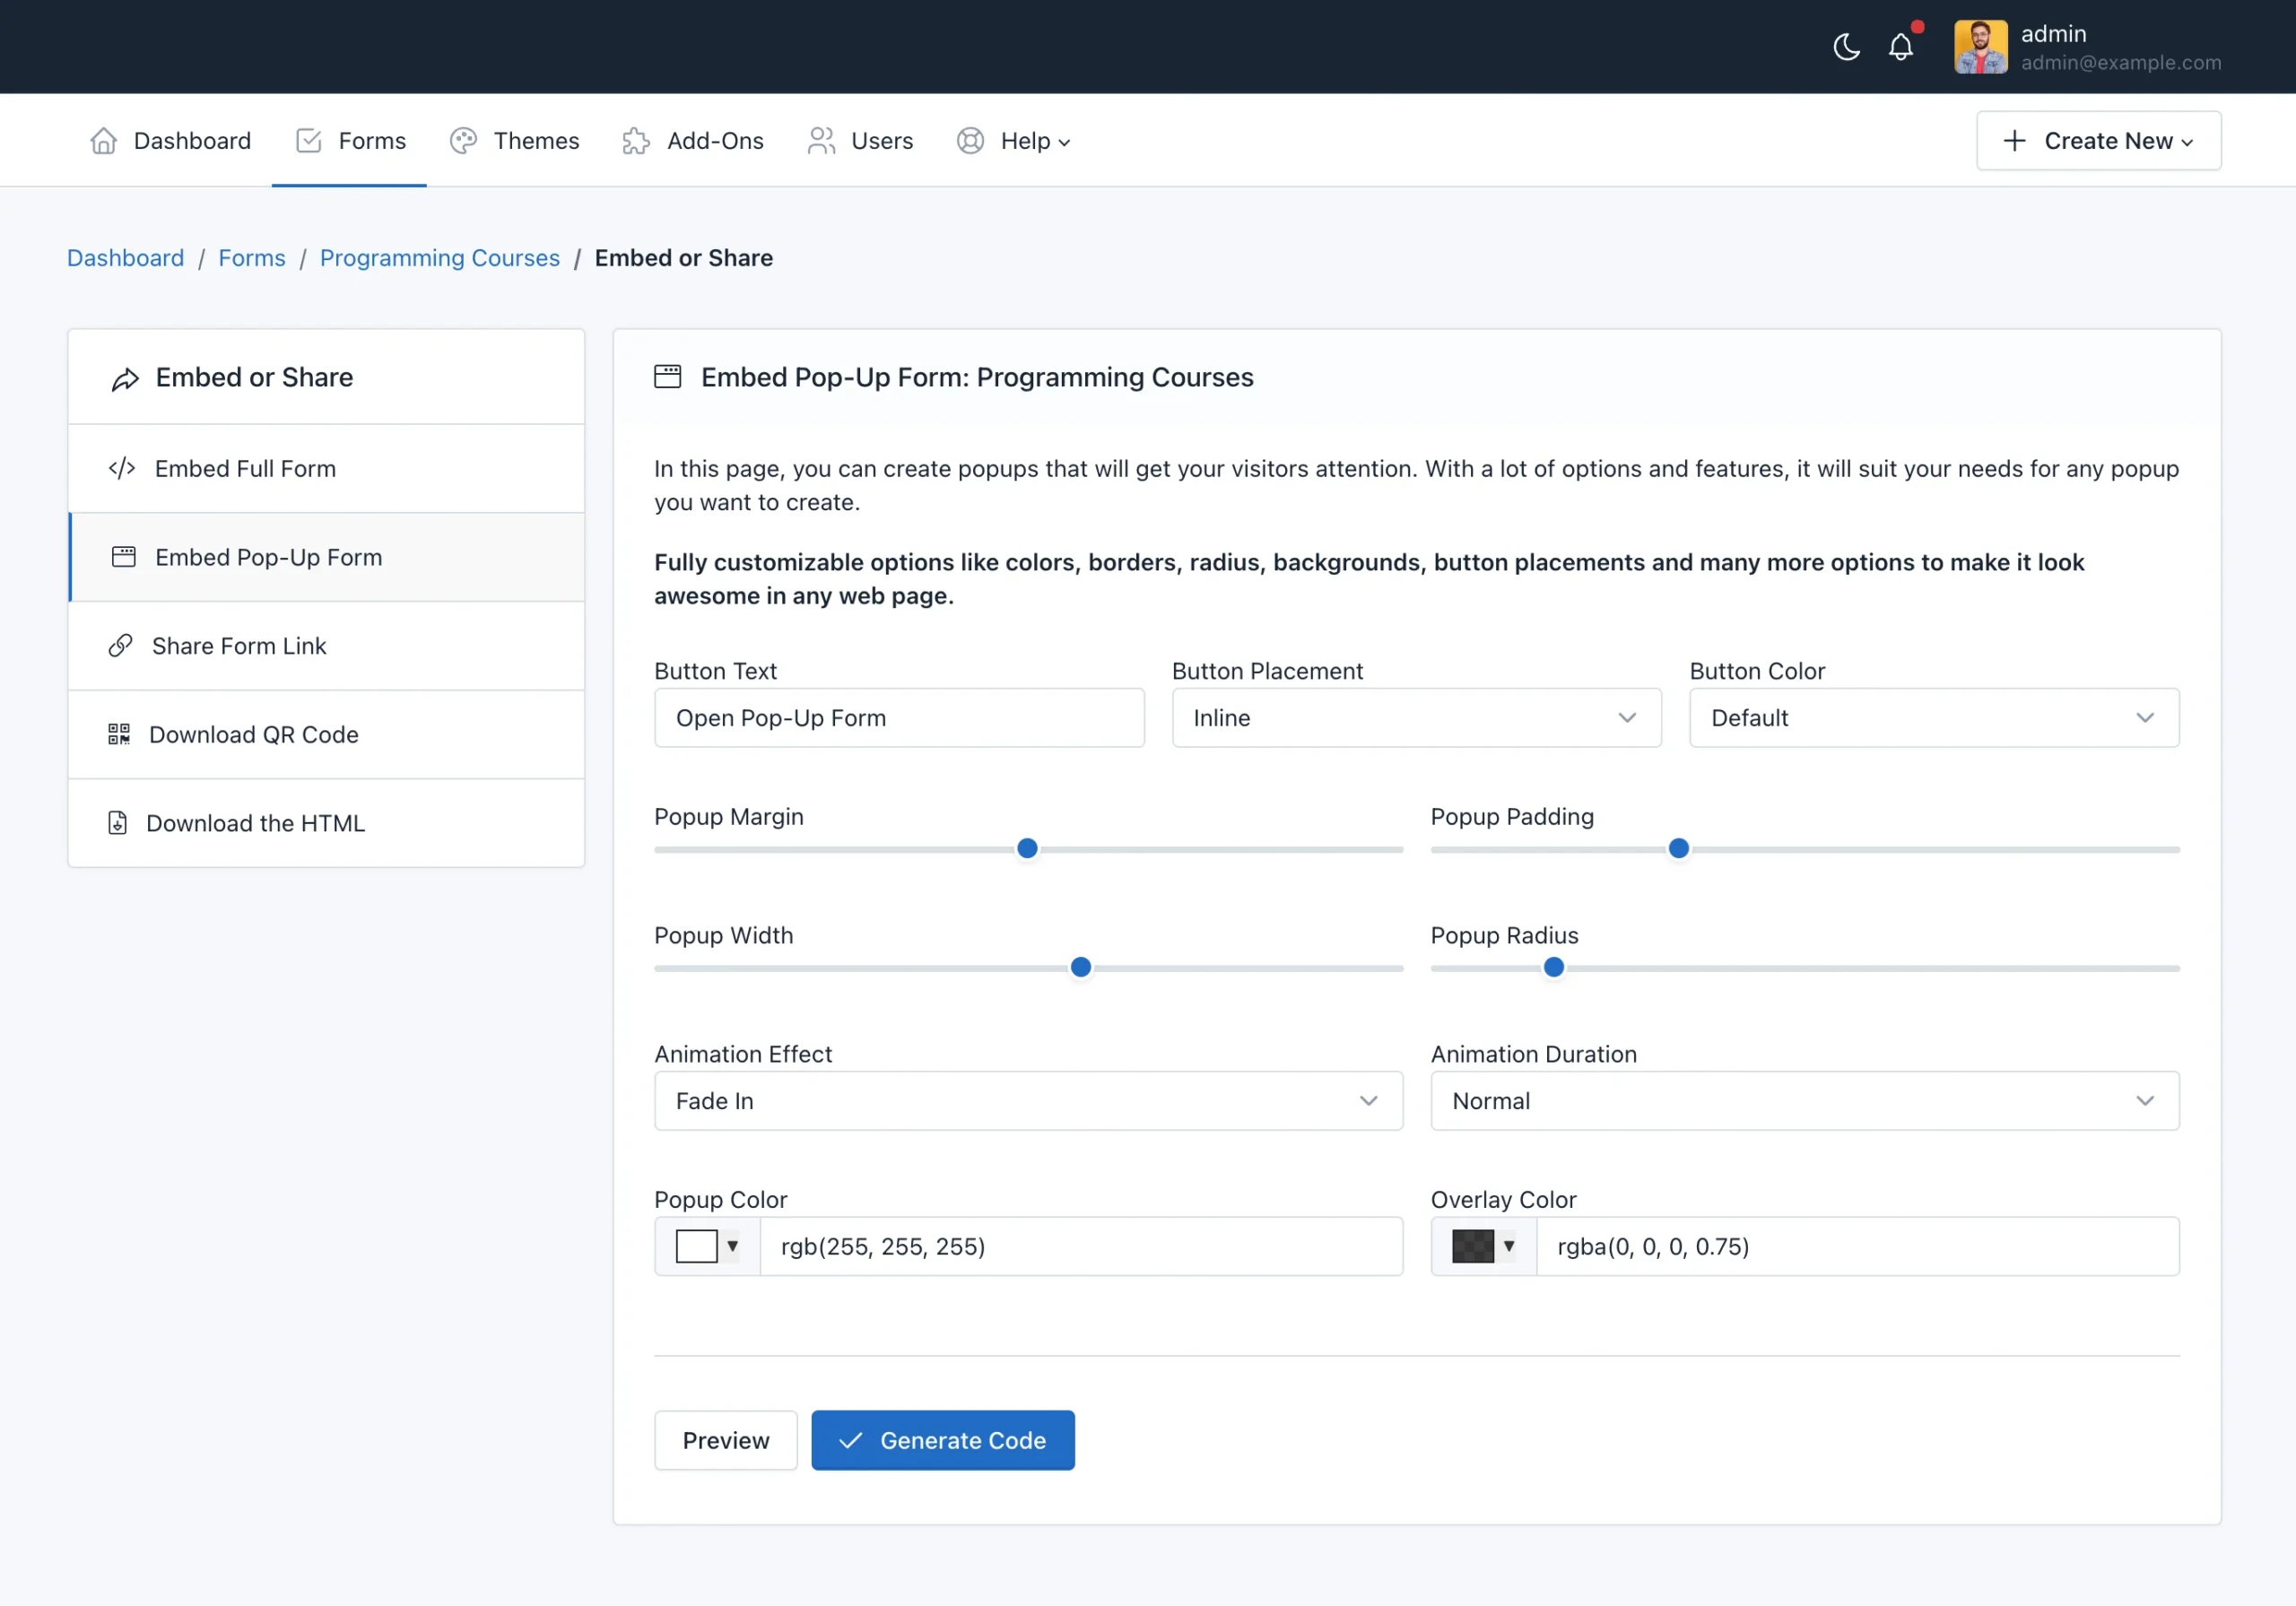
To finish, click on the “Generate code” button to open a modal and copy the HTML code that you must insert in your web page.
Share Form By Email
Jazz Forms offers a straightforward way to send an email to your users and include the Form URL.
To send a form by email, follow the next steps:
- In the navigation bar, click “Forms”
- Click on the form name you want to share
- Click on the “Publish and Share” button (the green arrow icon)
- Click on the “Send By Email” menu.
In this page you can define the Recipients email addresses, Sender Name, Reply-To Email Address, the Email Subject and Email Body.

Download QR Code
QR Codes are an excellent way to connect people from print media or invite people in a mobile world to complete your form.
To download the QR code, follow the next steps:
- In the navigation bar, click “Forms”
- Click on the form name you want to share
- Click on the “Publish and Share” button (the green arrow icon)
- Click on the “Download QR Code” menu.
In this page you can see the QR Code to the friendly link of your Form. Also, you can click the “Download” button to share it with your users.
Form’s Backend Endpoint / Download the HTML
Jazz Forms has the ability to generate endpoints, then you can use them to make fully customizable forms.
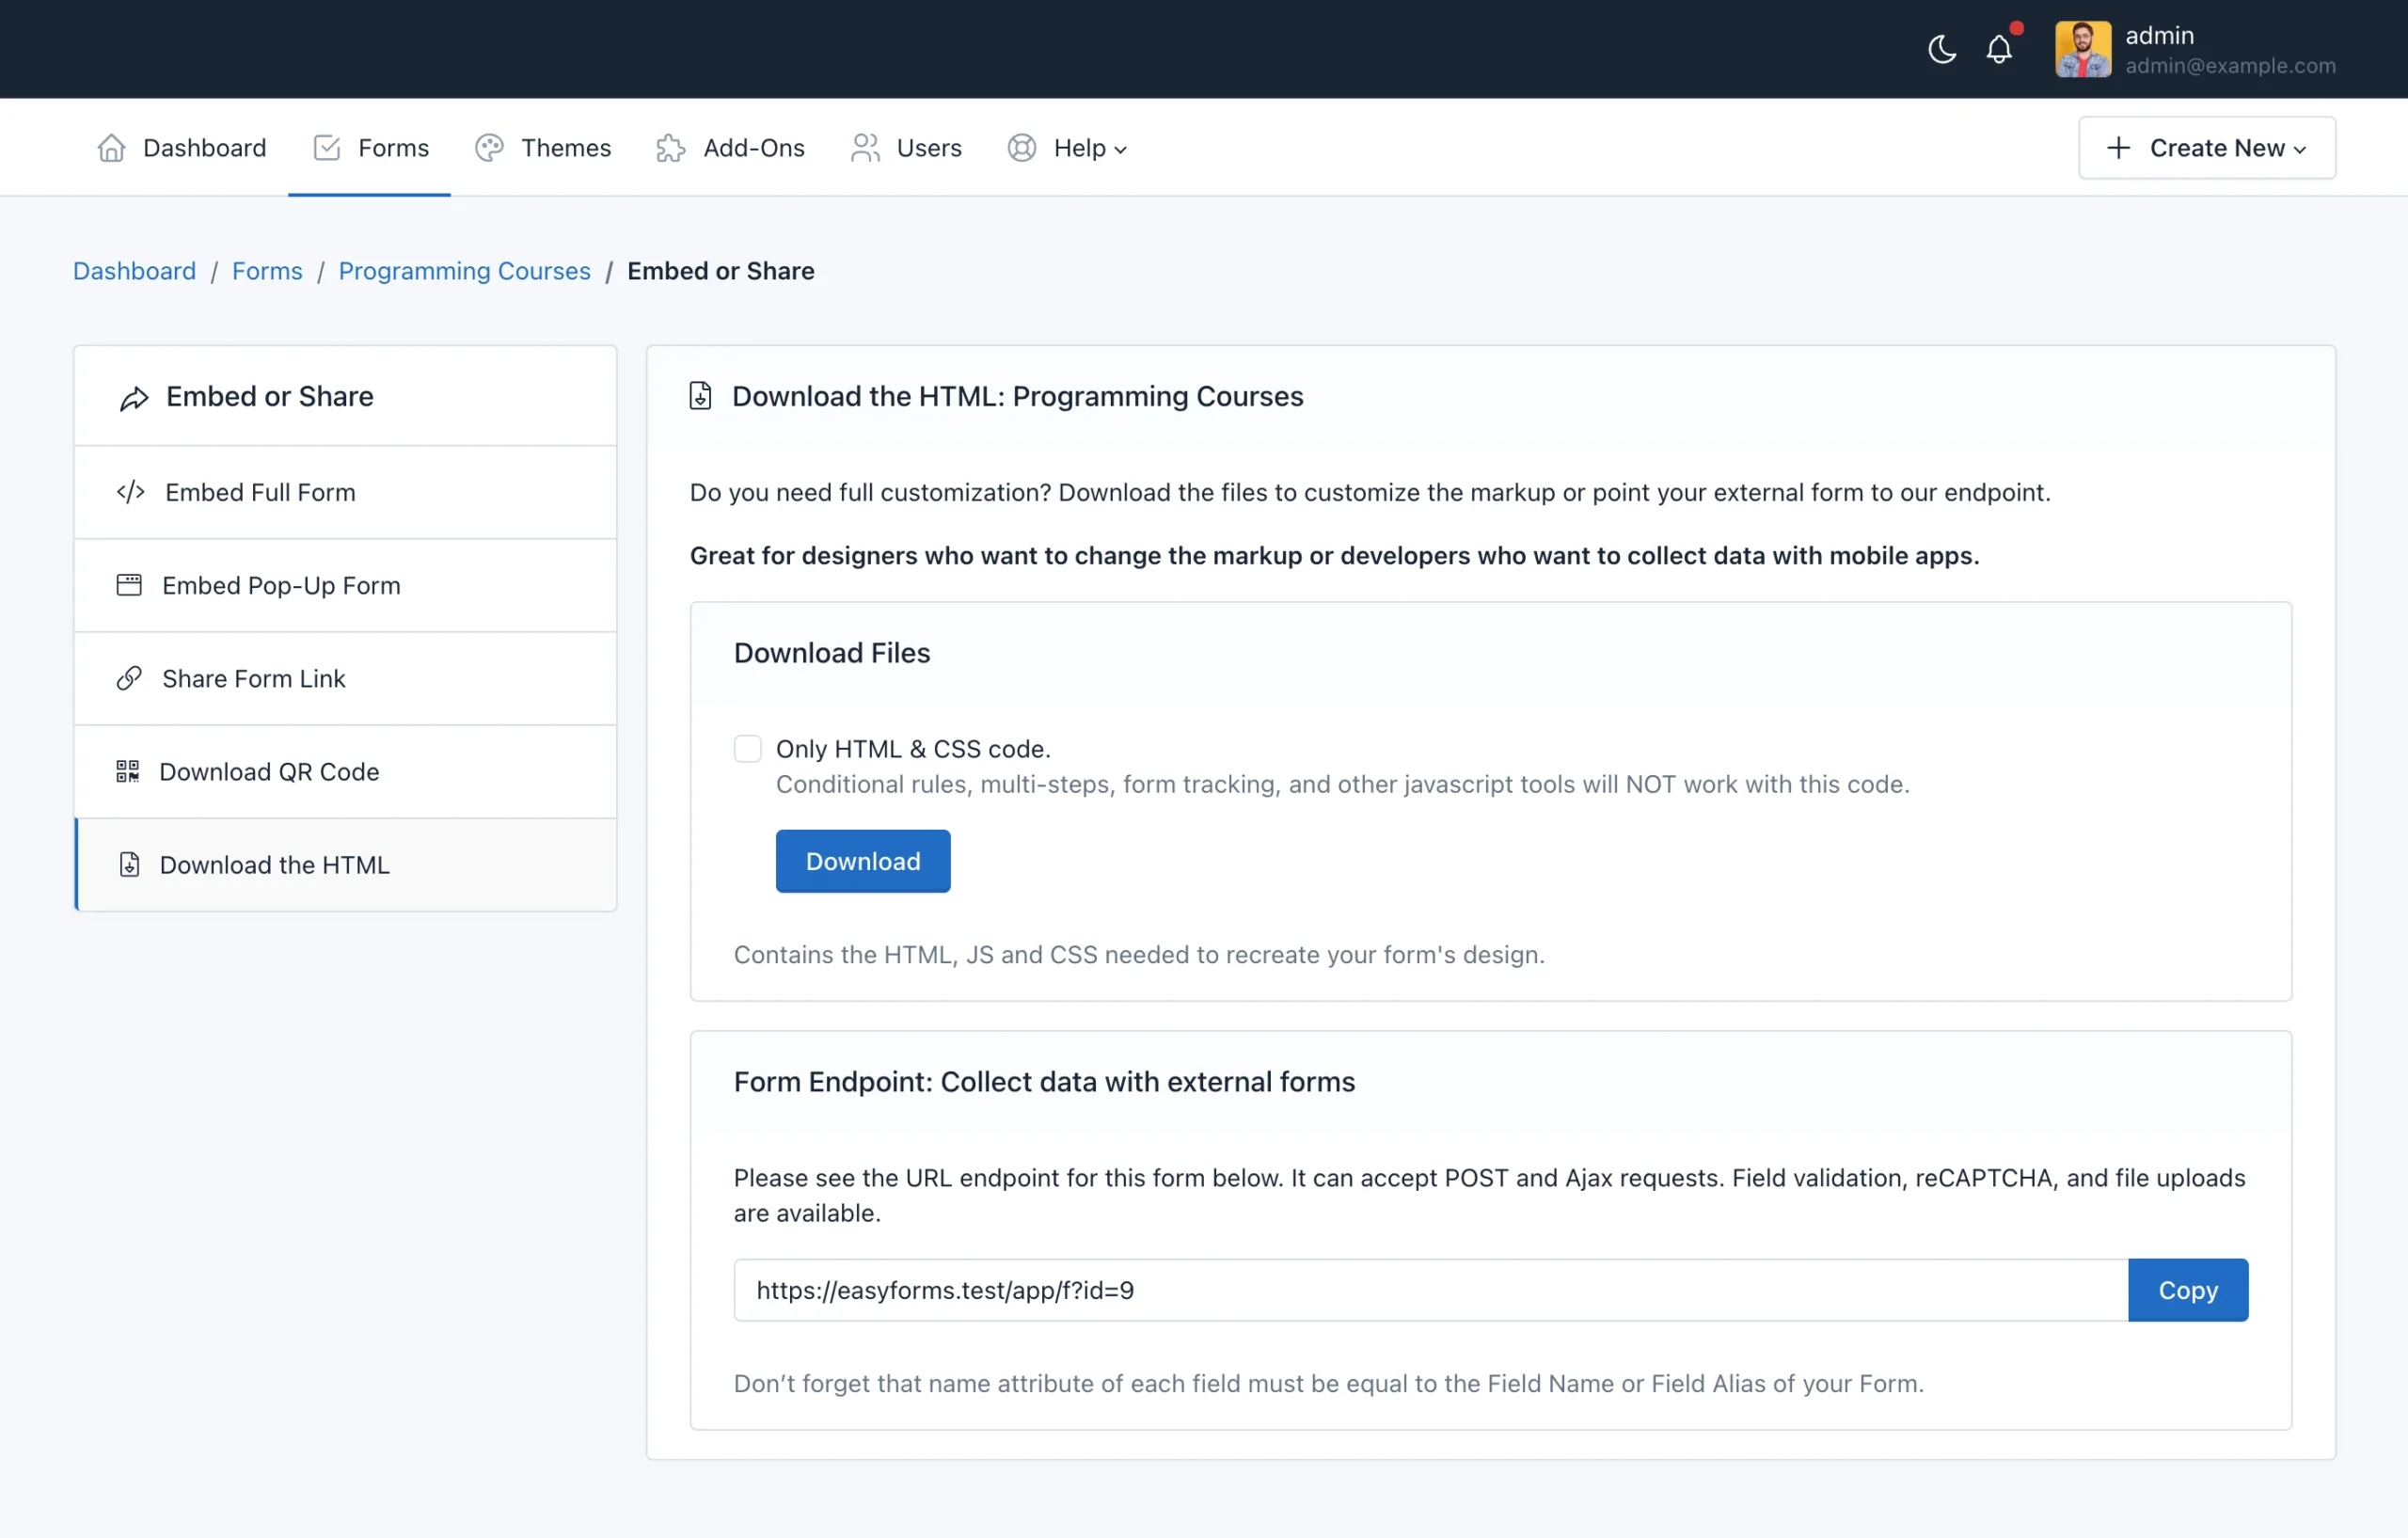
You can download the HTML code of your Form to integrate it directly on your webpage or mobile app, and use the form’s backend endpoint to collect data.
Download the HTML
To download the HTML code, follow the next steps:
- In the navigation bar, click “Forms”
- Click on the form name you want to share
- Click on the “Publish and Share” button (the green arrow icon)
- Click on the “Download the HTML” menu.
In this page you can see the button to download the HTML code as a ZIp file. Also, you can copy the Form Endpoint directly.
Note: If you want to replace the “name” attribute of each field, you need to set it as a Field Alias in the Form Builder.
Form Endpoints
To collect data with the Form Endpoint just copy the URL and change your landing page’s form ACTION url or point a Webhook to this URL. Just take into account two things:
- The field alias of each field should be equal to the field name of your form.
- If your POST request has an associative array format, you can use a Dot Notation. For example, Elementor Forms sends webhooks as associative arrays with this format:
[
  'fields' => [
    'name' => [
      ´value´ => 'John'
    ]
  ]
]
So, instead of using the alias: ‘name’, we need to use the dot notation. For this example, to capture “John” we need to use the following alias: fields.name.value.
Apply a theme to the form
To apply the theme you have created to a form, go to the Form Manager. Then, perform the following steps:
- Click the “Actions” button of the form in which you are going to apply the theme
- Click “Settings”
- Click the “UI Settings” tab
- Select a theme from the menu
- Click “Save”

Form Page Settings
To customize the landing pae where the form is displayed inside the application, go to the Form Manager. Then, perform the following steps:
- Click the “Actions” button of the form in which you are going to customize the landing page
- Click “Publish & Share”
- Click “Share Form Link”
- Click “Go”
Now you can see the Form Page with a “Settings” button in the top left-hand corner. When you click on that button, the form page configuration options will appear on the left side.
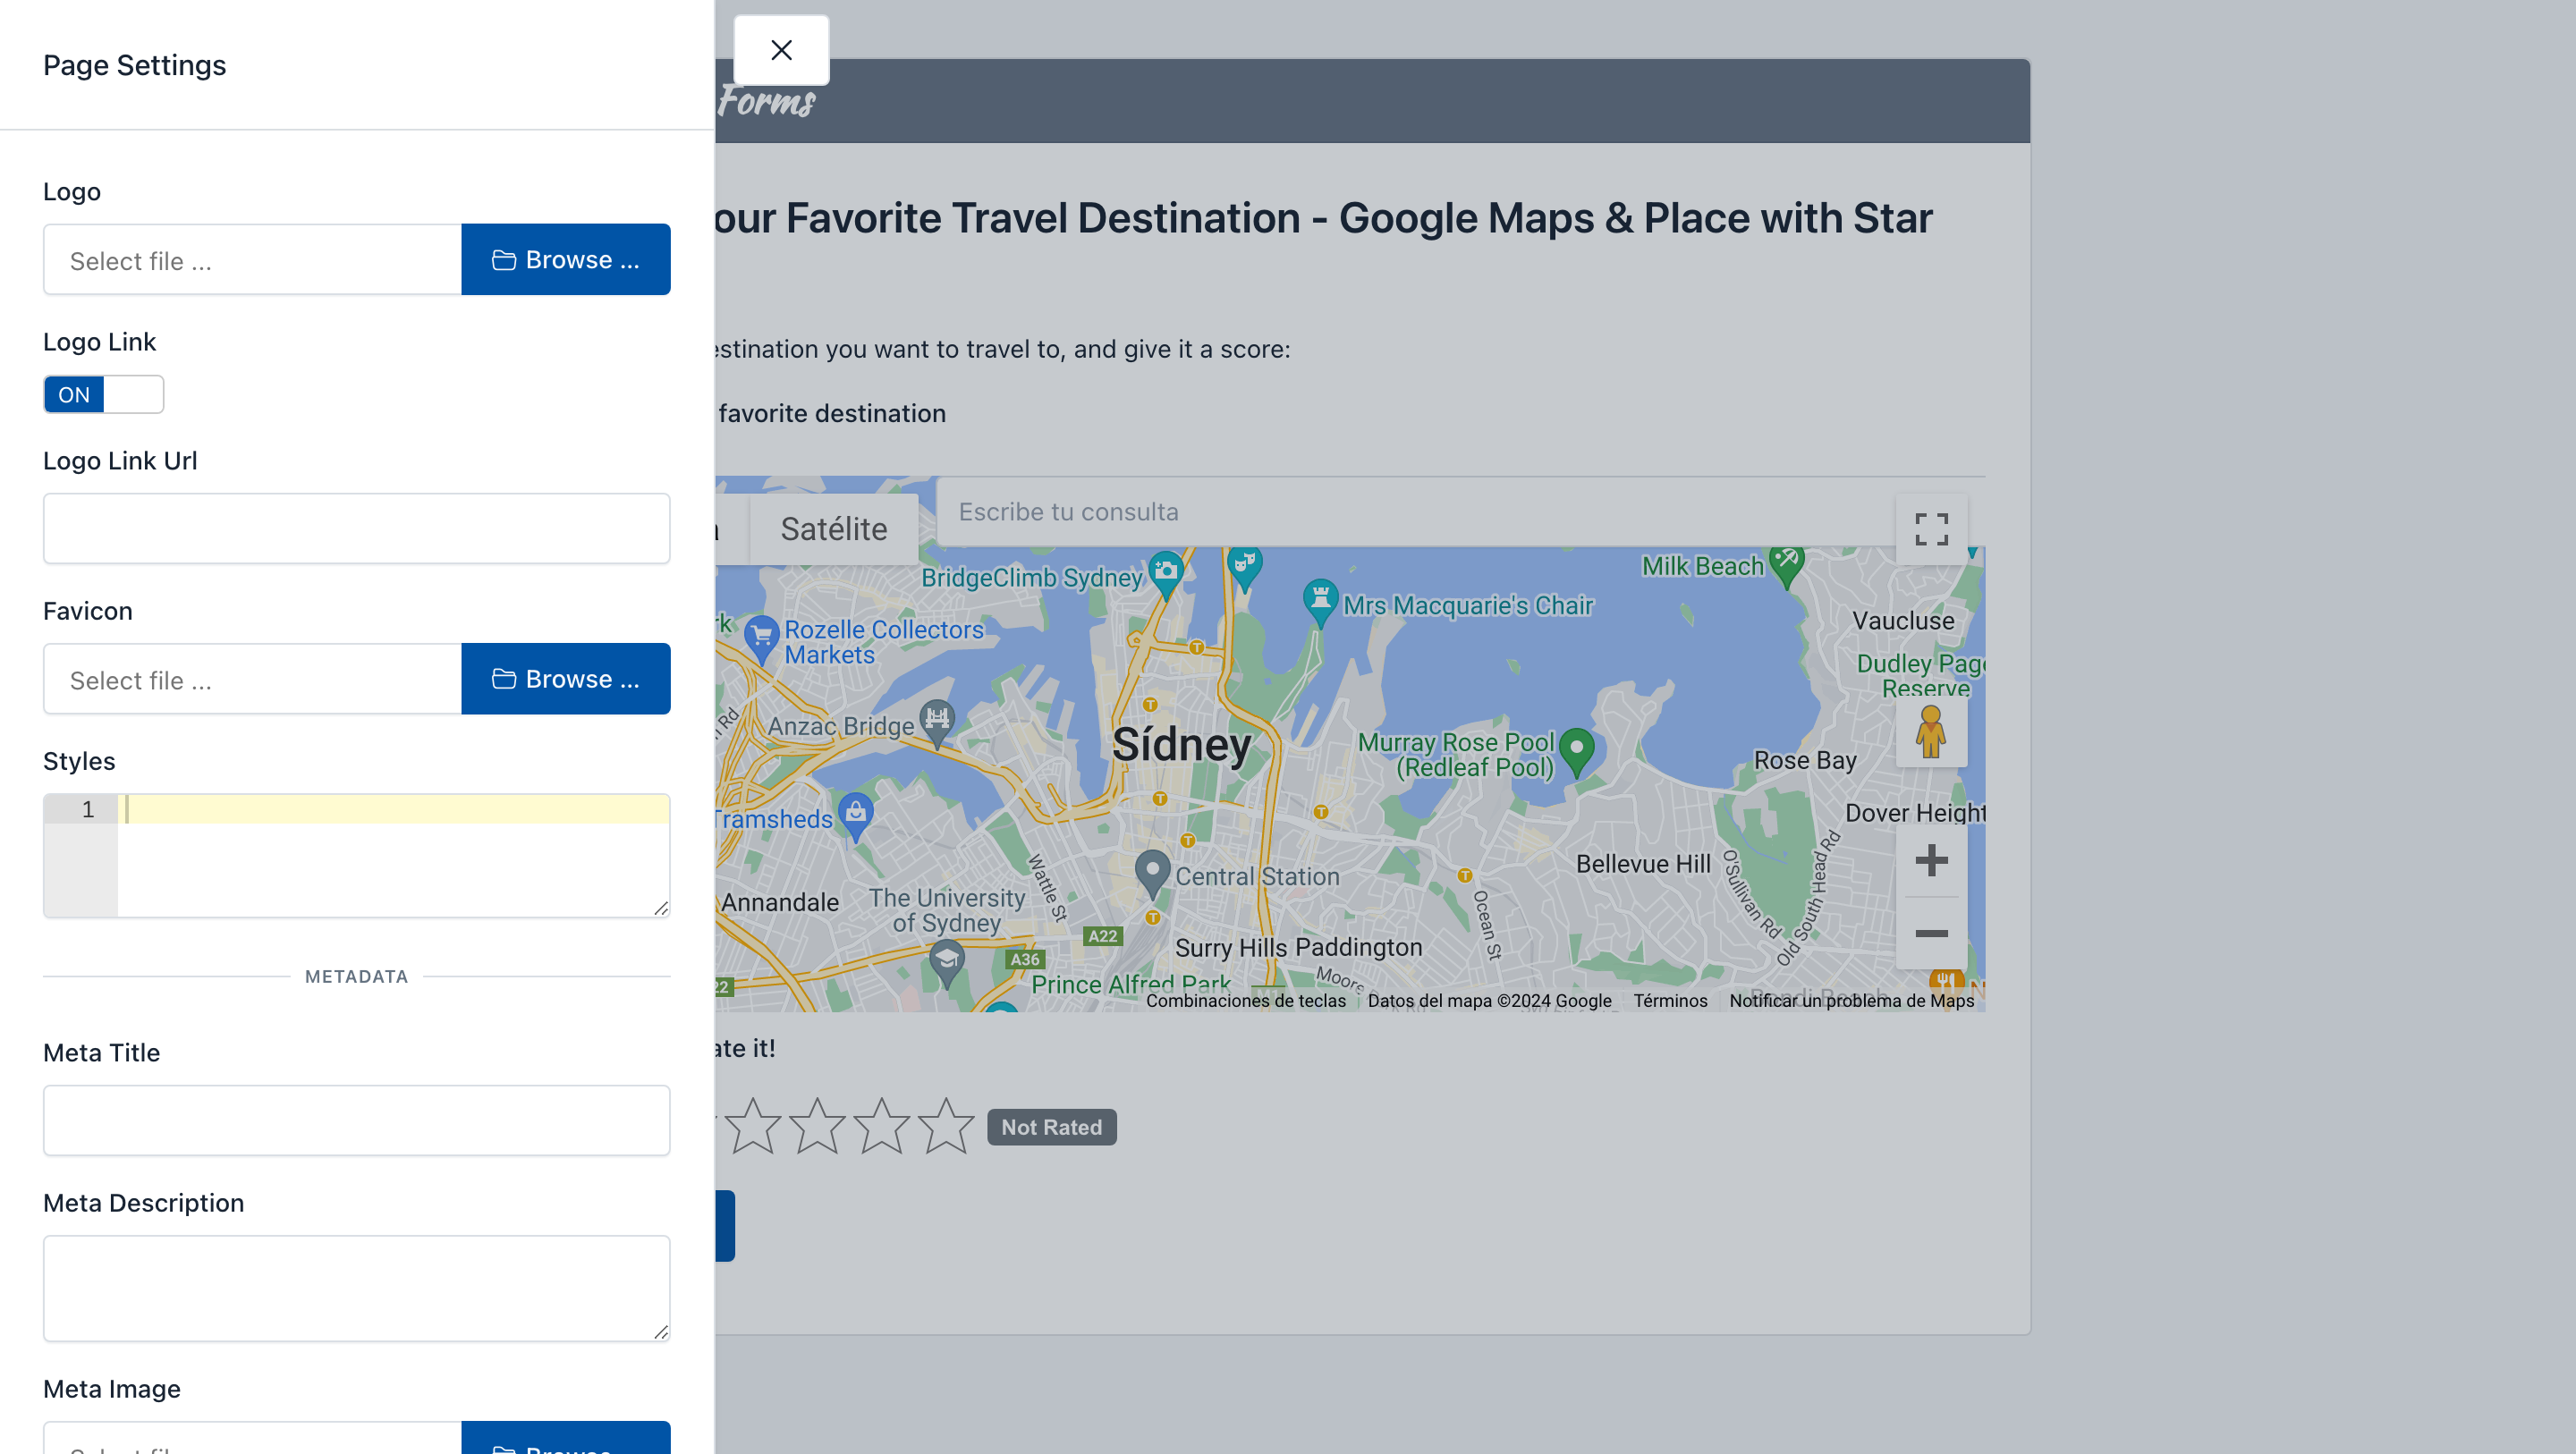
From here you can customize the following elements of the web page:
- Upload a custom logo
- Option to remove the link in the logo
- Option to customize the logo link
- Upload a custom favicon
- Define the CSS Styles for the form page
- Set a Meta Title, Meta Description and Meta Image
This way you can customize the look and feel of the entire landing page and customize the design when the form link is shared in social networks.